前言
实习开始使用机械臂末端是通过esp32开发的,经常有使用到wifi,蓝牙的通信协议在实际应用的过程中发现自己之前对于这部分的知识理解的不是很好,想根据自己所学的java和小程序一起结合Esp32实现温湿度传感器基于wifi和蓝牙使用。先从小程序+ESP32开始开发,了解通信协议的使用及其原理。
项目框架构
微信小程序框架
/pages
│
├── /index // 首页
│ └── index.wxml
│ └── index.js
│ └── index.wxss
│
├── /bluetooth // 蓝牙控制页面
│ └── index.wxml
│ └── index.js
│ └── index.wxss
│
├── /wifi // Wi-Fi HTTP协议控制页面
│ └── index.wxml
│ └── index.js
│ └── index.wxss
├── /Socket // Wi-Fi Socket协议控制页面
│ └── index.wxml
│ └── index.js
│ └── index.wxss
app.json
app.js
app.wxss
Esp32框架
/esp32
│ └── sketch_feb18a.ino // 主程序入口
│ └── bluetooth_communication.cpp // 蓝牙主程序入口
│ └── bluetooth_communication.h // 蓝牙头文件
│ └── wifi_communication.cpp // wifi HTTP协议主程序入口
│ └── wifi_communication.h // wifi HTTP协议头文件
│ └── WebSocketServer.cpp // wifi Socket协议主程序入口
│ └── WebSocketServer.h // wifi Socket协议主程序入口
│ └── WiFiManager.cpp // wifi 主程序入口
│ └── WiFiManager.h // wifi 头文件
整体框架思维导图
微信小程序
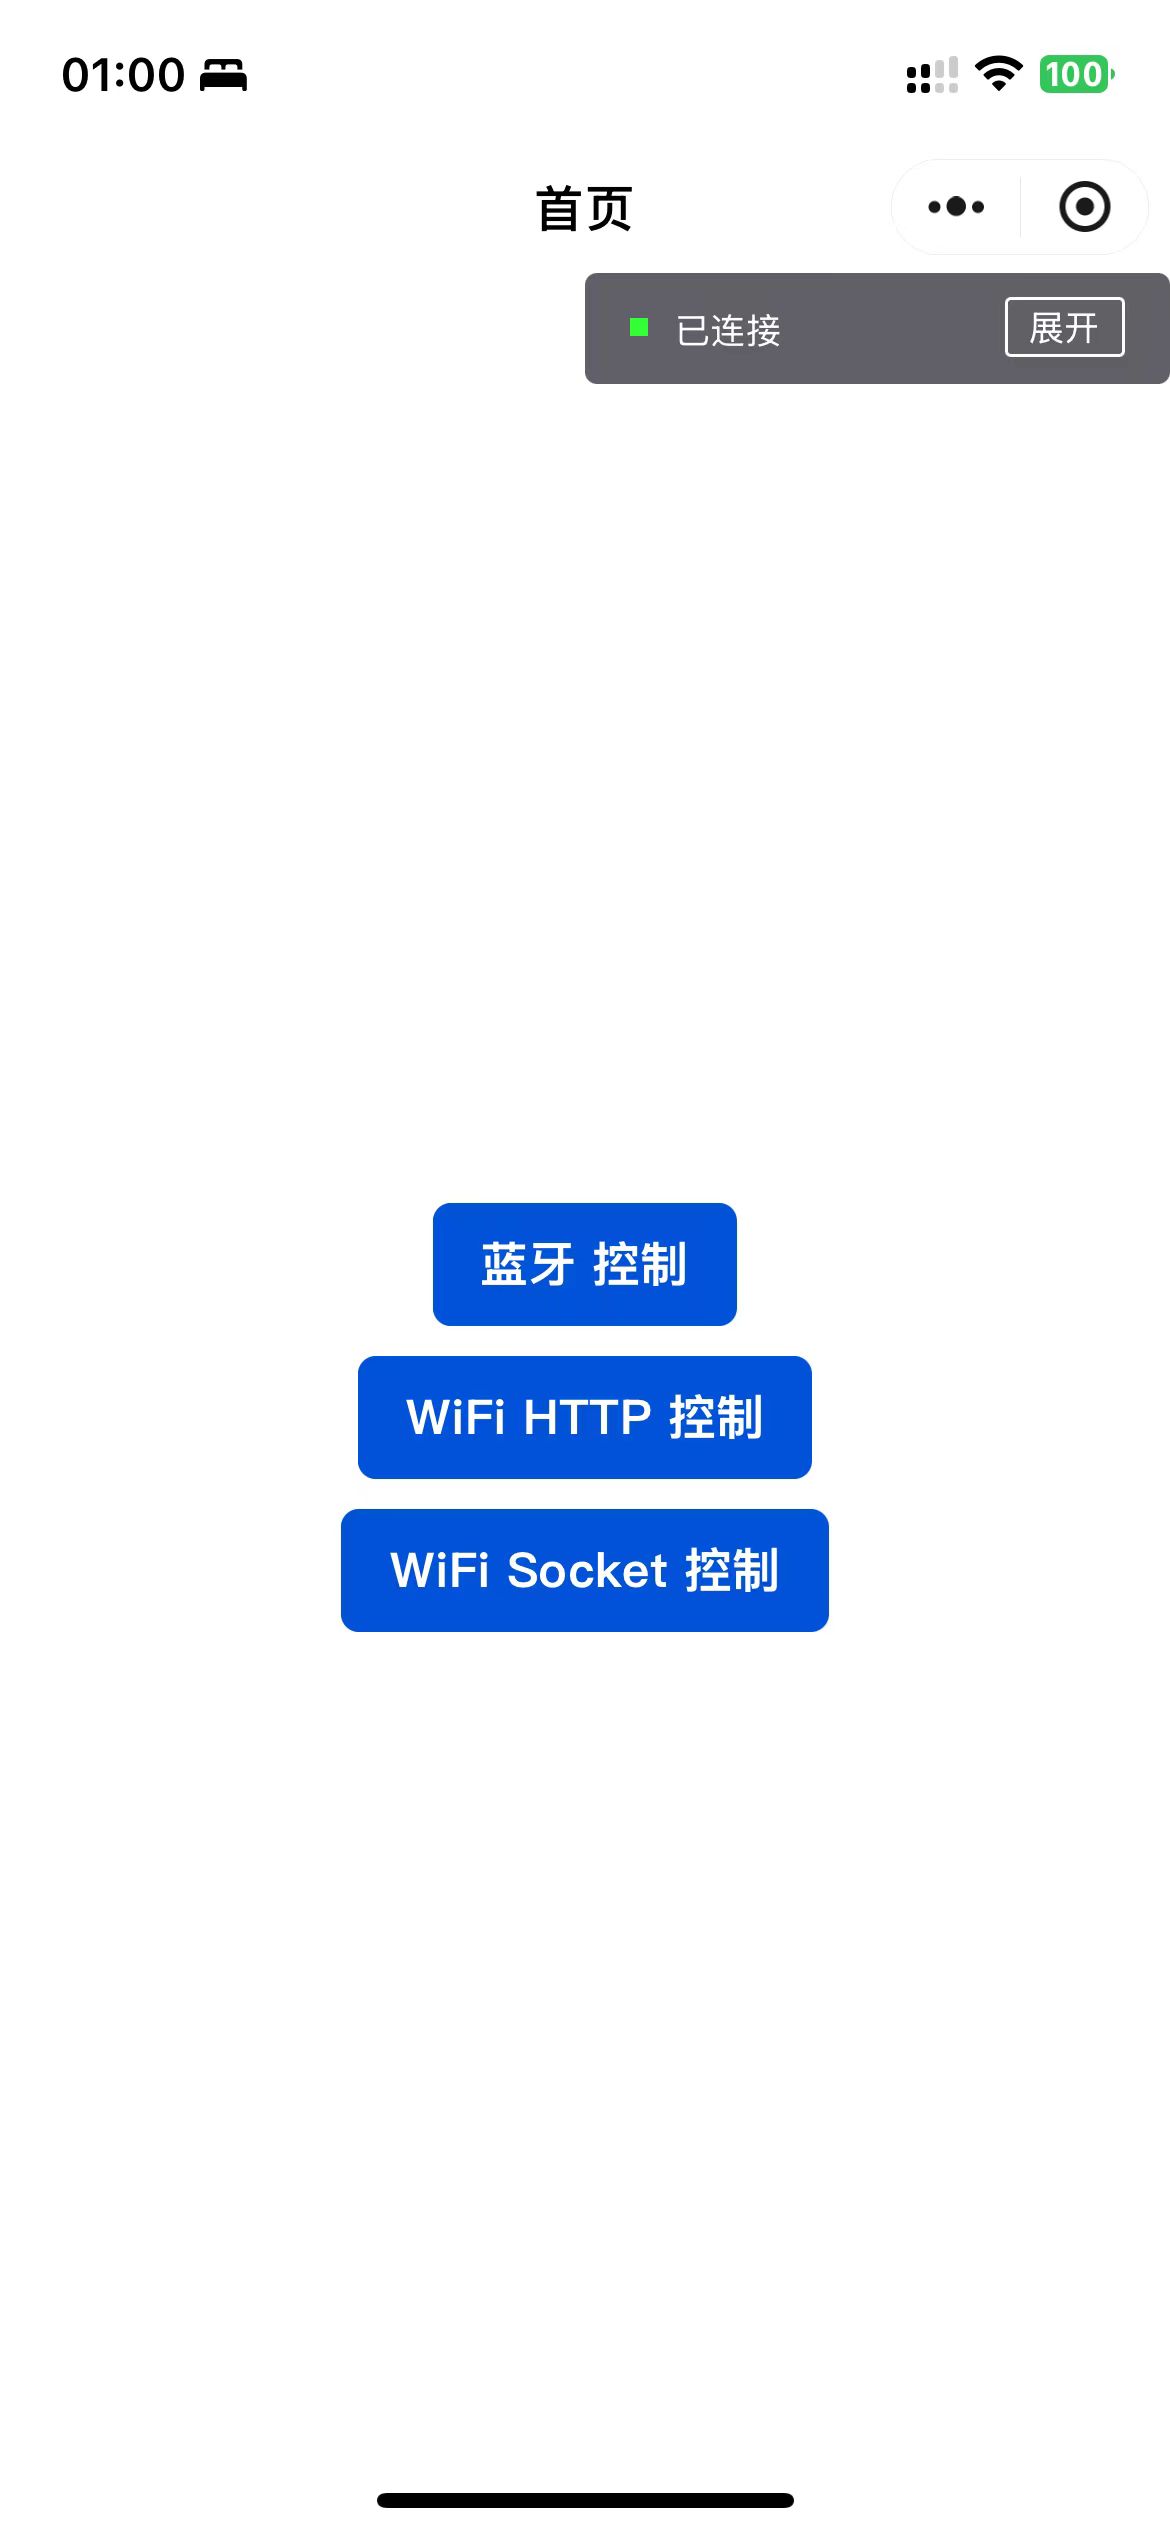
首页
首页主要就是3个按钮选择合适的模式,然后读取ESP32的温湿度,同时也可以发送数据给ESP32后台,从而实现数据交互。
index.wxml
<view class="container">
  <view class="refresh-section">
    <t-button size="medium" theme="primary" bindtap="goToBluetooth">蓝牙 控制</t-button>
  </view>
  <view class="refresh-section">
    <t-button size="medium" theme="primary" bindtap="goToWiFiHttp">WiFi HTTP 控制</t-button>
  </view>
  <view class="refresh-section">
    <t-button size="medium" theme="primary" bindtap="goToWiFiSocket">WiFi Socket 控制</t-button>
  </view>
</view>
index.js
Page({
  goToBluetooth() {
    wx.navigateTo({
      url: '/pages/bluetooth/index' // 跳转到蓝牙控制页面
    });
  },
  goToWiFiHttp() {
    wx.navigateTo({
      url: '/pages/wifi/index' // 跳转到 Wi-Fi H控制页面
    });
  },
  goToWiFiSocket() {
    wx.navigateTo({
      url: '/pages/socket/index' // 跳转到 Wi-Fi socket控制页面
    });
  }
});
index.wxss
.container {
display: flex;
flex-direction: column;
align-items: center;
justify-content: center;
height: 100vh; /* 让容器占满整个视口高度 */
}
.refresh-section {
margin-top: 10px;
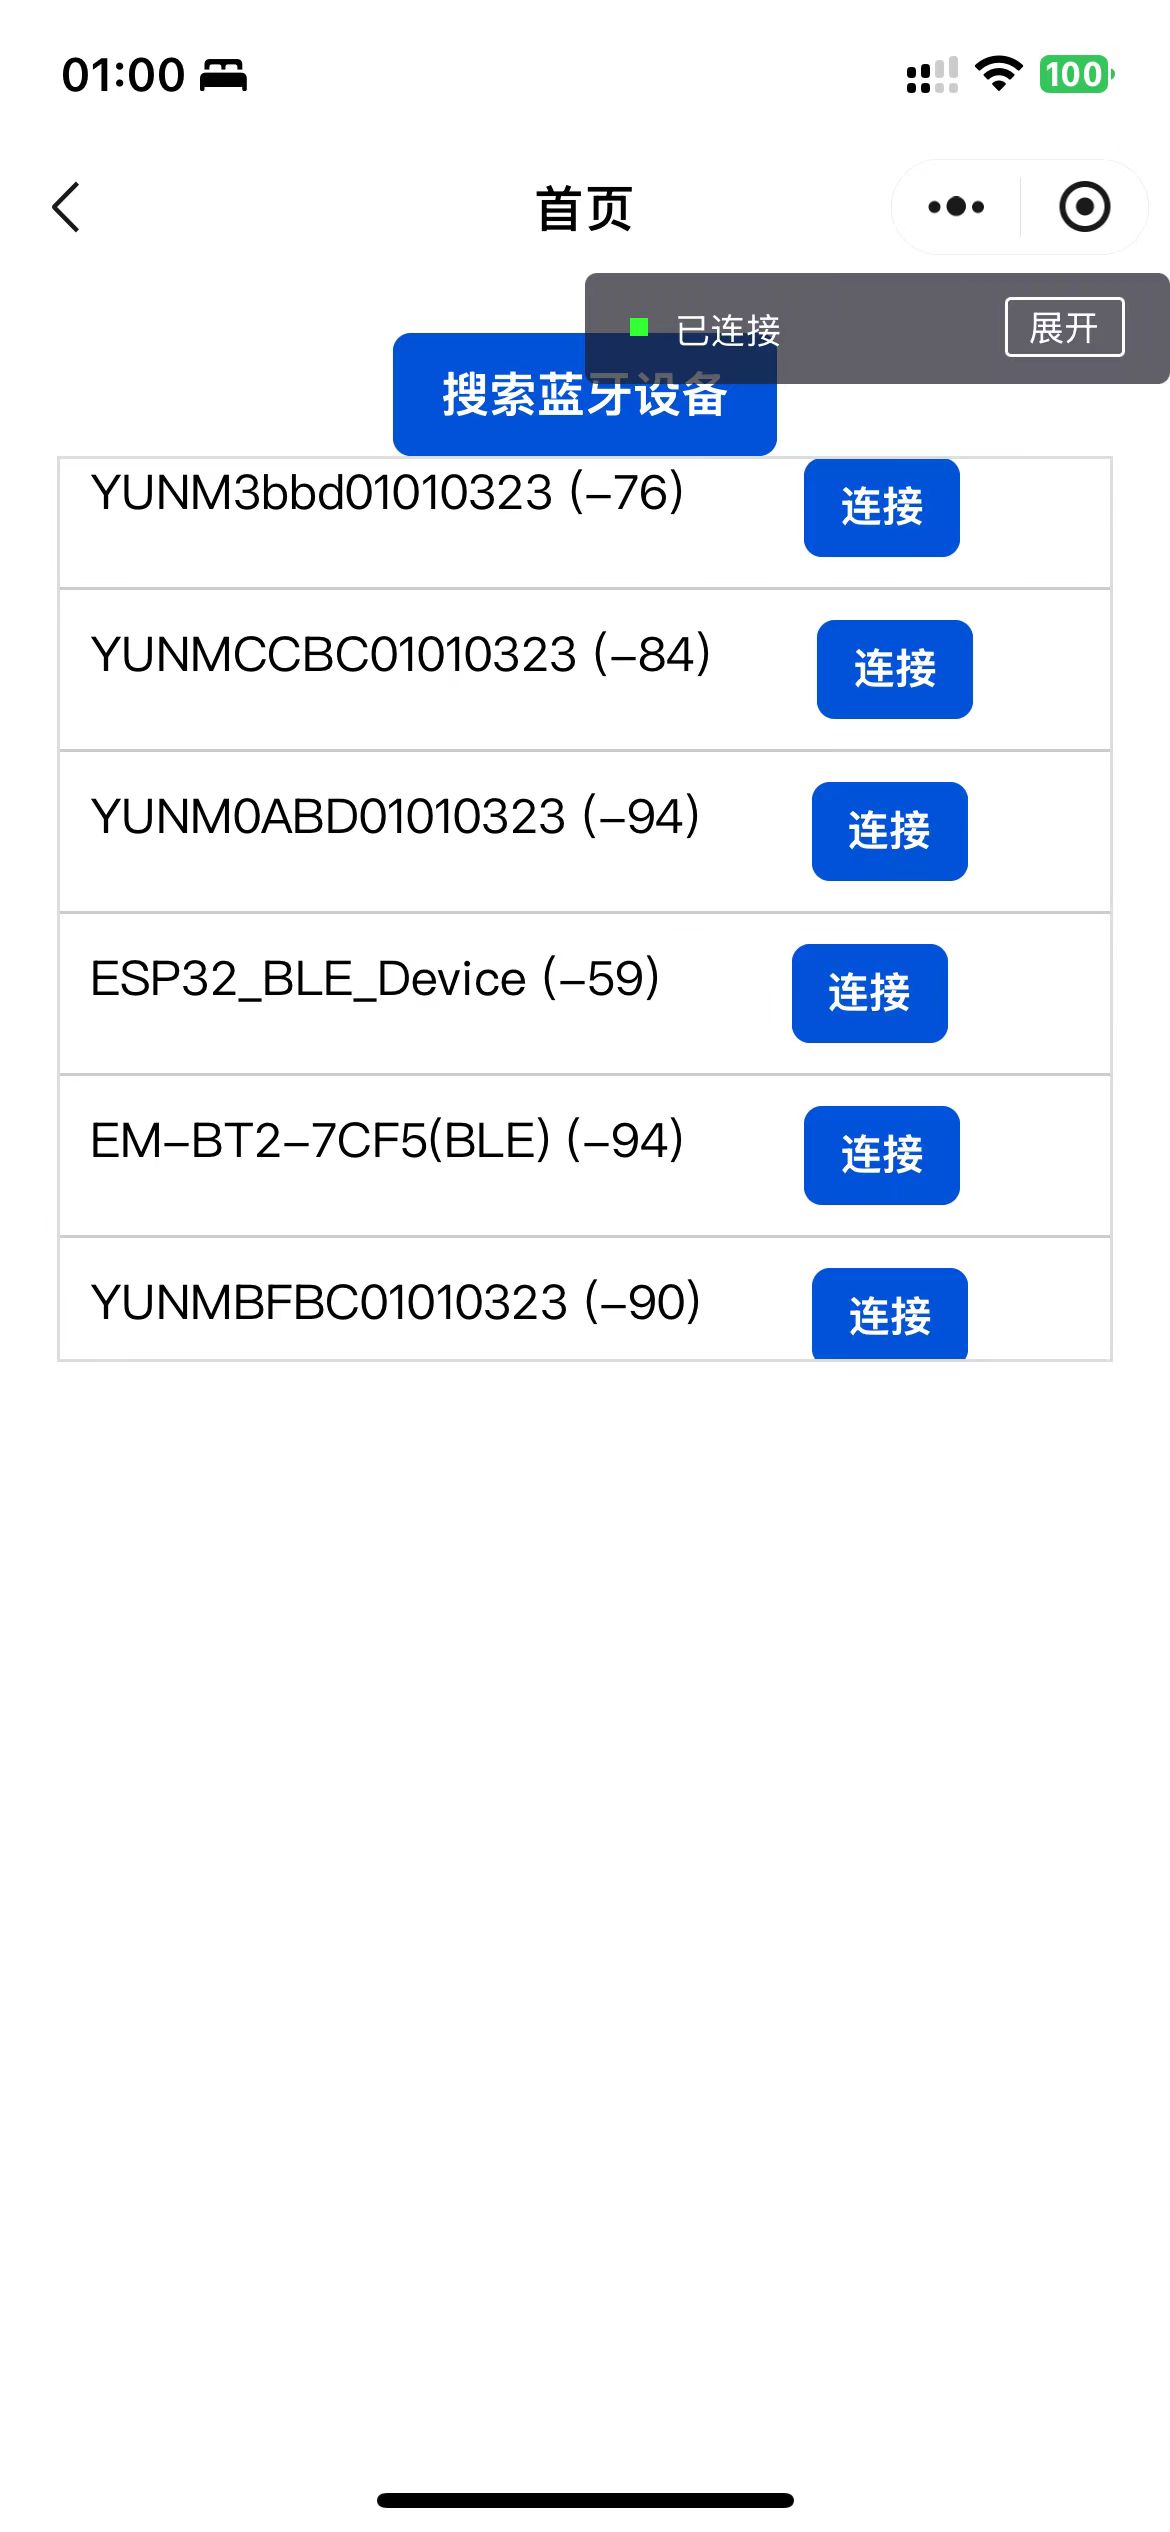
}蓝牙
蓝牙模式还是比较简单的,只要开启通知,因为我在ESP32端一直在发送温湿度,所以在小程序端,点击搜索蓝牙后,一直可以读取到温湿度的值,这个里面比较坑的地方就是你ESP32段传入的数据格式,要和小程序端的数据格式一致,我这里使用的是JSON,因为键值对的数据结构格式传输是最好用,且格式比较简单的。同时这个也可以实现ESP32和小程序的数据交换

index.wxml
<view class="container">
  <t-button size="medium" theme="primary" bindtap="openBluetoothAdapter">搜索蓝牙设备</t-button>

  <!-- 设备列表区域 -->
  <scroll-view wx:if="{{!connected}}" class="device-list" scroll-y="true">
    <view wx:for="{{devices}}" wx:key="deviceId" class="device-item">
      <block wx:if="{{item.name !== '未知设备'}}">
        <text>{{item.name}} ({{item.RSSI}})</text>
        <t-button size="small" theme="primary" bindtap="createBLEConnection" data-id="{{item.deviceId}}">连接</t-button>
      </block>
    </view>
  </scroll-view>

  <view wx:if="{{connected}}">
    <view>
      <text class="nowrap">已连接设备ID: {{deviceId}}</text>
    </view>
    <view>
      <text class="nowrap">蓝牙服务ID: {{serviceId}}</text>
    </view>
    <view>
      <text class="nowrap">特征值ID: {{characteristicId}}</text>
    </view>
    <view>
      <text class="nowrap">接收到的数据: {{receivedData}}</text>
    </view>
    <input placeholder="输入要发送的数据" bindinput="onInputChange" value="{{sendData}}" />
   <view class="button-group">
    <t-button size="medium" theme="primary" bindtap="writeBLECharacteristicValue">发送数据</t-button>
    <t-button size="medium" theme="primary" bindtap="closeBLEConnection">断开连接</t-button>
   </view>

    <!-- 温湿度仪表盘区域 -->
    <view class="dashboard">
      <!-- 温度图标及数据 -->
      <view class="icon-wrapper">
        <image src="../images/温度.png" class="icon" />
        <text class="value-text">{{temperature}}°C</text>
      </view>
      <!-- 湿度图标及数据 -->
      <view class="icon-wrapper">
        <image src="../images/湿度.png" class="icon" />
        <text class="value-text">{{humidity}}%</text>
      </view>
    </view>

  </view>
</view>
index.js
Page({
  data: {
    devices: [], // 蓝牙设备列表
    connected: false, // 是否已连接蓝牙
    deviceId: '', // 当前连接的设备ID
    serviceId: '', // 蓝牙服务ID
    characteristicId: '', // 特征值ID
    receivedData: '',  // 接收到的数据
    temperature: 25,       // 温度初始值
    humidity: 60,           // 湿度初始值
    sendData: ''
  },

  // 初始化蓝牙模块
  openBluetoothAdapter() {
    wx.openBluetoothAdapter({
      success: (res) => {
        console.log('初始化蓝牙成功', res);
        this.startBluetoothDevicesDiscovery();
      },
      fail: (err) => {
        console.error('初始化蓝牙失败', err);
        wx.showToast({ title: '请打开蓝牙', icon: 'none' });
      }
    });
  },

  // 开始搜索蓝牙设备
  startBluetoothDevicesDiscovery() {

    wx.startBluetoothDevicesDiscovery({
      allowDuplicatesKey: false,
      success: (res) => {
        console.log('开始搜索蓝牙设备', res);
        this.getBluetoothDevices();
      }
    });
  },

  // 获取蓝牙设备列表
  getBluetoothDevices() {
    this.setData({ devices: [] });
    wx.onBluetoothDeviceFound((devices) => {
      const newDevices = devices.devices.map(device => ({
        name: device.name || '未知设备',
        deviceId: device.deviceId,
        RSSI: device.RSSI
      }));
      // 去重合并设备列表
      const devicesMap = new Map(this.data.devices.map(item => [item.deviceId, item]));
      newDevices.forEach(device => devicesMap.set(device.deviceId, device));
      this.setData({
        devices: Array.from(devicesMap.values()).filter(device => device.name && device.name !== '未知设备')
      });
    });
  },

  // 连接蓝牙设备
  createBLEConnection(e) {
    const deviceId = e.currentTarget.dataset.id;

    wx.createBLEConnection({
      deviceId: deviceId,
      success: (res) => {
        console.log('蓝牙连接成功', res);
        this.setData({
          connected: true,
          deviceId: deviceId,
          // serviceId: serviceId,
          // characteristicId: serviceId,
        });
        wx.showToast({ title: '蓝牙连接成功', icon: 'success' });
        // 在连接成功后调用获取服务的函数:
        this.getBLEDeviceServices(deviceId);
      },
      fail: (err) => {
        console.error('蓝牙连接失败', err);
        wx.showToast({ title: '蓝牙连接失败', icon: 'none' });
      }
    });
  },

  // 获取蓝牙服务
  getBLEDeviceServices(deviceId) {
    wx.getBLEDeviceServices({
      deviceId: deviceId,
      success: (res) => {
        console.log('获取到蓝牙服务', res);
        const serviceId = res.services[0].uuid; // 第一个服务是我们需要的,因为我只设置了一个服务
        this.setData({ serviceId });
        this.getBLEDeviceCharacteristics(deviceId, serviceId);
      }
    });
  },

  // 获取蓝牙特征值
  getBLEDeviceCharacteristics(deviceId, serviceId) {
    wx.getBLEDeviceCharacteristics({
      deviceId: deviceId,
      serviceId: serviceId,
      success: (res) => {
        console.log('获取到蓝牙特征值', res);
        const characteristicId = res.characteristics[0].uuid;
        console.log(characteristicId)
        this.setData({ characteristicId });
        this.startNotification(deviceId, serviceId, characteristicId);
      }
    });
  },

  // 开启蓝牙特征值通知
  startNotification(deviceId, serviceId, characteristicId) {
    wx.notifyBLECharacteristicValueChange({
      state: true,
      deviceId: deviceId,
      serviceId: serviceId,
      characteristicId: characteristicId,
      success: (res) => {
        console.log('已开启蓝牙通知', res);
        wx.onBLECharacteristicValueChange((result) => {
          const data = this.buf2string(result.value);
          console.log('接收到蓝牙数据', data);
          this.setData({ receivedData: data });
          this.parseAndUpdateDashboard(data)
        });
      },
      fail: (err) => {
        console.error('开启通知失败', err);
      }
    });
  },
    // 解析蓝牙数据并更新仪表盘(示例:数据格式 "T:26,H:65")
  parseAndUpdateDashboard(data) {
    console.log('收到数据:', data);
    let dataD = typeof data === 'string' ? JSON.parse(data) : data;
    this.setData({
      wifiData: dataD.message || '', // 显示原始数据
      temperature: dataD.temperature || 0, // 更新温度数据
      humidity: dataD.humidity || 0, // 更新湿度数据
    });
    },

    // 更新数据
  updateDashboard(newTemp, newHumi) {
      this.setData({
        temperature: newTemp,
        humidity: newHumi
      });
    },
    onInputChange(e) {
      // 更新输入框内容到 data 中
      this.setData({
        sendData: e.detail.value
      });
    },
  // 向蓝牙设备写入数据,自动读取输入框内容
  writeBLECharacteristicValue() {
    const text = this.data.sendData || '';
    if (!text) {
      wx.showToast({ title: '请输入数据', icon: 'none' });
      return;
    }
    // 将字符串转换为 ArrayBuffer
    const buffer = new ArrayBuffer(text.length);
    const dataView = new Uint8Array(buffer);
    for (let i = 0; i < text.length; i++) {
      dataView[i] = text.charCodeAt(i);
    }
    console.log('发送的 buffer:', new Uint8Array(buffer));

    wx.writeBLECharacteristicValue({
      deviceId: this.data.deviceId,
      serviceId: this.data.serviceId,
      characteristicId: this.data.characteristicId,
      value: buffer,
      success: (res) => {
        console.log('数据写入成功', res);
      },
      fail: (err) => {
        console.error('数据写入失败', err);
      }
    });
  },
  // 断开蓝牙连接
  closeBLEConnection() {
    wx.closeBLEConnection({
      deviceId: this.data.deviceId,
      success: (res) => {
        console.log('蓝牙已断开', res);
        this.setData({
          connected: false,
          deviceId: ''
        });
      }
    });
  },

  // 页面卸载时停止蓝牙搜索和关闭适配器
  onUnload() {
    wx.stopBluetoothDevicesDiscovery();
    wx.closeBluetoothAdapter();
  },
   // 辅助方法:ArrayBuffer 转字符串
   buf2string(buffer) {
    return String.fromCharCode.apply(null, new Uint8Array(buffer));
  }
});
index.wxss
.container {
display: flex;
flex-direction: column;
height: 100%;
}
.device-list {
max-height: 300px; /* 根据需求设置高度 */
overflow: hidden;
border: 1px solid #ddd;
}
.nowrap {
width: 100%; /* 设置容器宽度,可以根据需要调整 */
word-wrap: break-word; /* 允许在单词内换行 */
word-break: break-all; /* 强制换行,即使单词过长 */
margin-bottom: 10px; /* 在行与行之间添加间距 */
}
.device-item {
display: flex;
justify-content: space-between;
padding: 10px;
border-bottom: 1px solid #ccc;
}
.container {
padding: 20px;
}
.device-item {
display: flex;
justify-content: space-between;
padding: 10px;
border-bottom: 1px solid #ccc;
}
.dashboard {
display: flex;
justify-content: space-around;
margin-top: 20px;
}
.icon-wrapper {
display: flex;
flex-direction: column;
align-items: center;
}
.icon {
width: 80px;
height: 80px;
}
.value-text {
margin-top: 10px;
font-size: 20px;
color: #333;
}
/* 按钮组样式 */
.button-group {
display: flex;
justify-content: center; /* 水平居中 */
align-items: center; /* 垂直居中 */
gap: 20px; /* 按钮之间的间距 */
margin-top: 20px; /* 与上一个元素的间距 */
}
/* 按钮样式 */
.button-group t-button {
flex: 1; /* 按钮宽度自适应 */
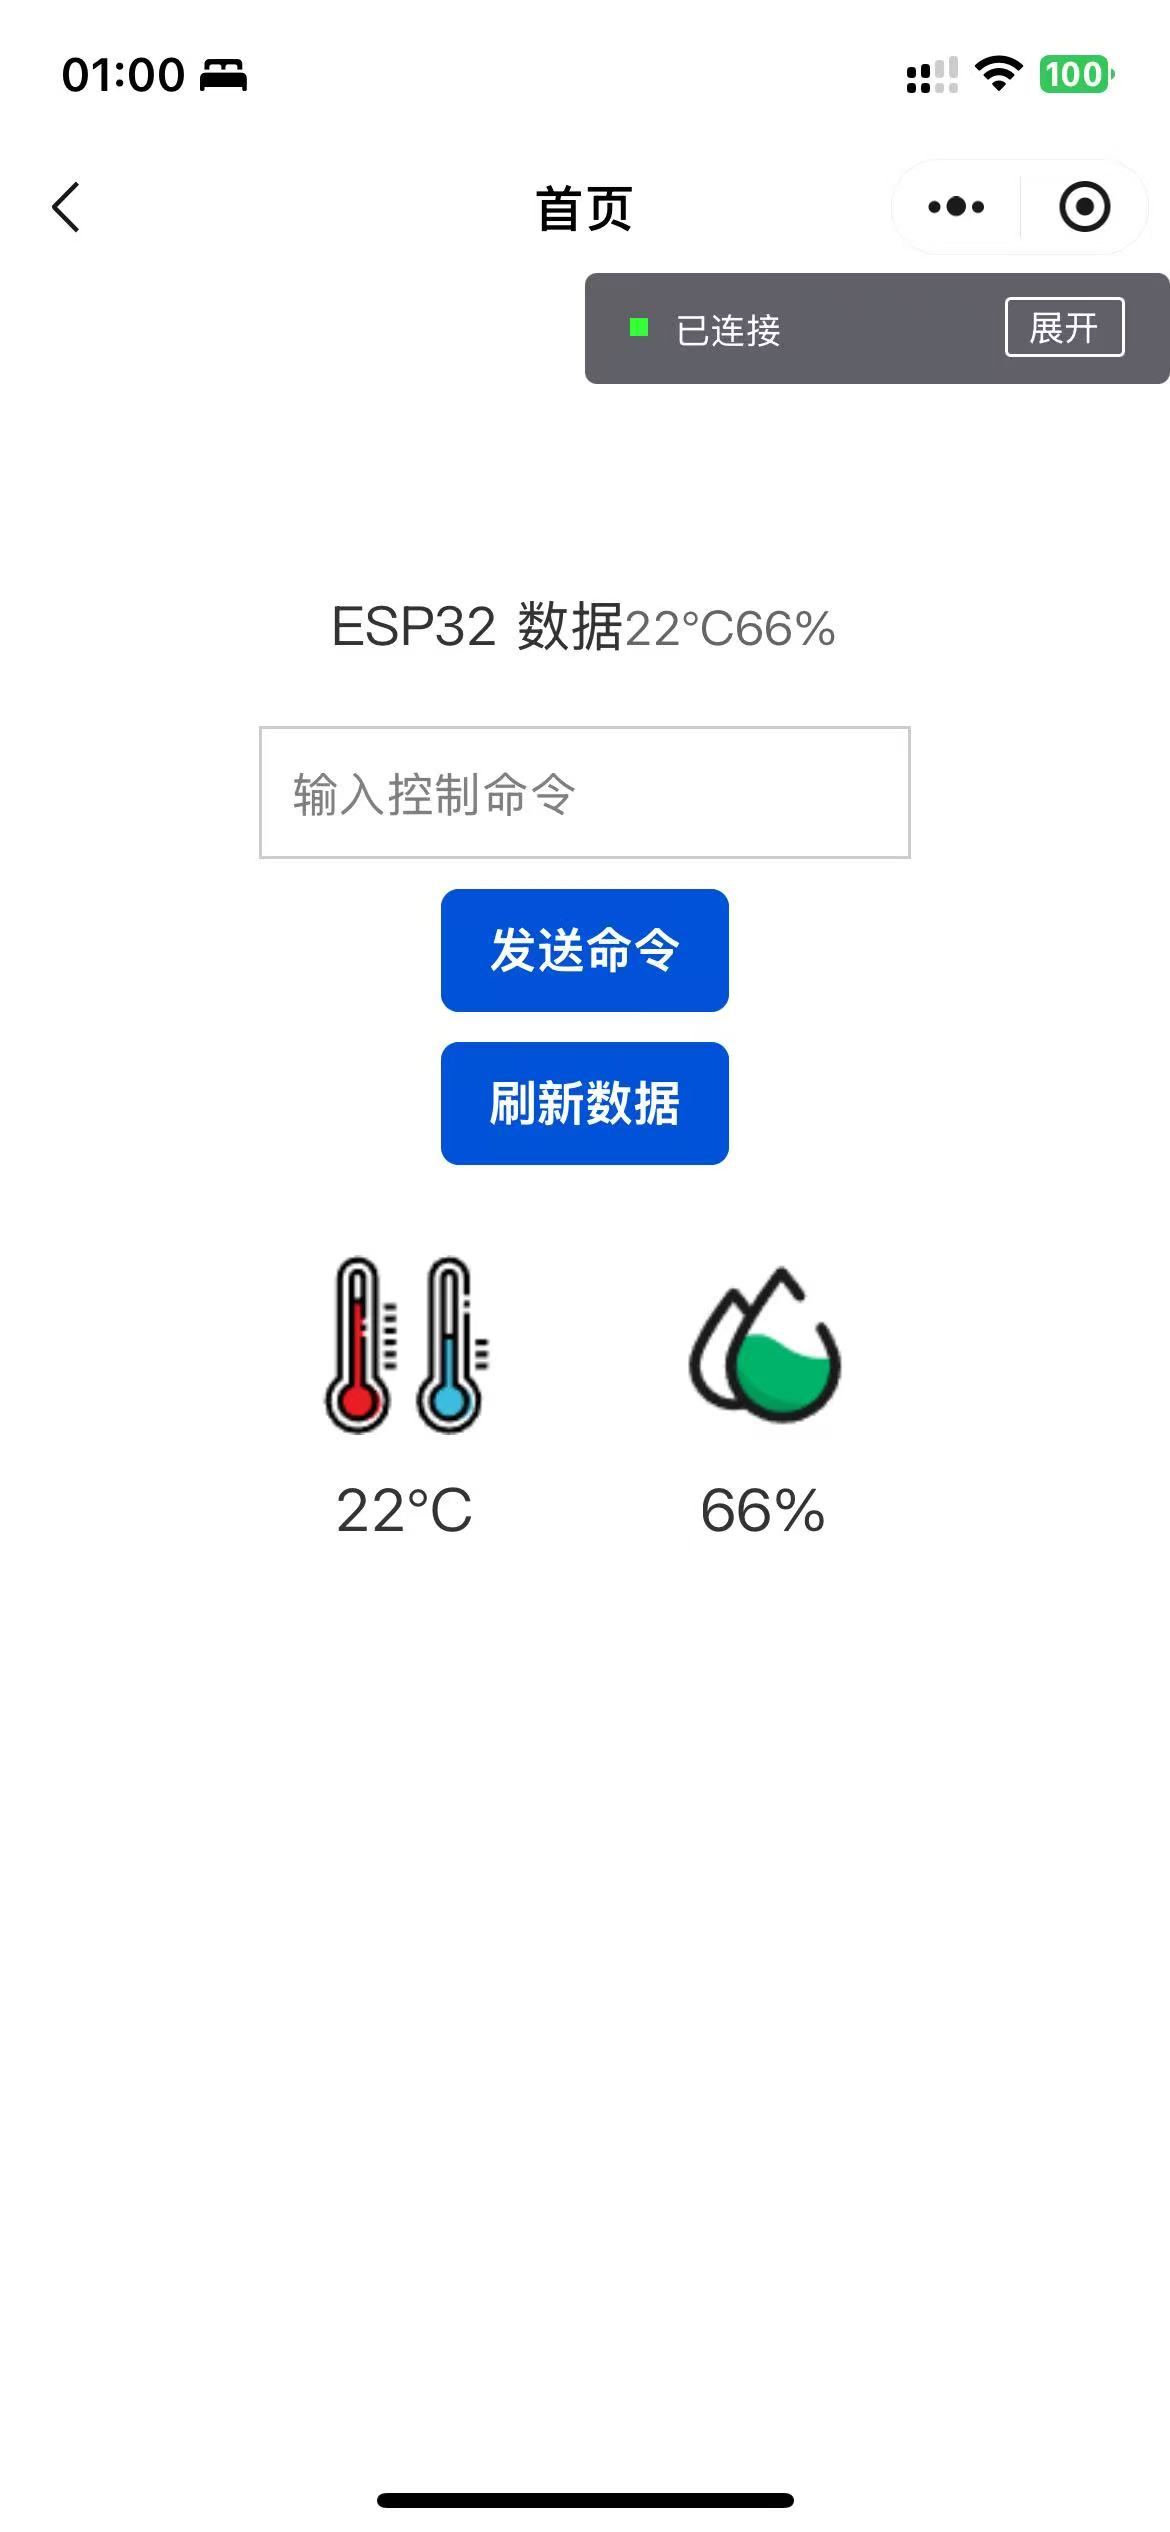
}Wifi HTTP协议控制
HTTP协议端其实是比较简单的,只是简单的实现了数据交换,本质上就是request请求发送POST和GET请求,因为是JS的写法其实和JAVA里面使用的也是没有什么太大区别的。就不过多阐述了,参考官方的手册传参,注意数据格式即可
index.wxml
<view class="container">
  <!-- 显示 ESP32 返回的数据 -->
  <view class="data-section">
    <text class="title">ESP32 数据</text>
    <text class="data">{{temperature}}°C{{ humidity}}%</text>
  </view>

  <!-- 控制命令输入和发送 -->
  <view class="control-section">
    <input placeholder="输入控制命令" bindinput="onInputChange" value="{{controlCmd}}" class="input"/>
    <t-button size="medium" theme="primary" bindtap="sendCmd">发送命令</t-button>
    <!-- <button bindtap="sendCmd" class="btn">发送命令</button> -->
  </view>

  <!-- 可选:刷新数据按钮 -->
  <view >
    <t-button size="medium" theme="primary" bindtap="getDataFromESP32">刷新数据</t-button>
    <!-- <button bindtap="getDataFromESP32" class="btn">刷新数据</button> -->
  </view>
      <!-- 温湿度区域 -->
  <view class="dashboard">
      <!-- 温度图标及数据 -->
      <view class="icon-wrapper">
        <image src="../images/温度.png" class="icon" />
        <text class="value-text">{{temperature}}°C</text>
      </view>
      <!-- 湿度图标及数据 -->
      <view class="icon-wrapper">
        <image src="../images/湿度.png" class="icon" />
        <text class="value-text">{{humidity}}%</text>
      </view>
  </view>
</view>
index.js
Page({
  data: {
    // 用来显示从 ESP32 获取的数据,比如温湿度
    wifiData: '',
    // 输入的控制命令
    controlCmd: '',
    temperature: '',       // 温度初始值
    humidity: '',           // 湿度初始值
  },

  onLoad() {
    // 页面加载时,尝试获取 ESP32 的数据
    this.getDataFromESP32();
  },
  updateDashboard(newTemp, newHumi) {
    this.setData({
      temperature: newTemp,
      humidity: newHumi
    });
  },
  // 通过 HTTP GET 请求从 ESP32 获取数据
  getDataFromESP32() {
    wx.request({
      url: 'http://192.168.88.100/data', // 请修改为你的 ESP32 IP 和端口,以及数据接口路径
      method: 'GET',
      header: {
        'content-type': 'application/json'
      },
      success: (res) => {
        console.log('获取数据成功', res.data);
        let data = typeof res.data === 'string' ? JSON.parse(res.data) : res.data;
        // const data = JSON.parse(res.data); //
        this.updateDashboard(data.temperature, data.humidity);
        // this.setData({
        //   wifiData: res.data
        // });
      },
      fail: (err) => {
        console.error('获取数据失败', err);
        wx.showToast({ title: '获取数据失败', icon: 'none' });
      }
    });
  },

  // 当输入框内容改变时更新数据
  onInputChange(e) {
    this.setData({
      controlCmd: e.detail.value
    });
  },

  // 发送控制命令给 ESP32 HTTP
  sendCmd() {
    if (!this.data.controlCmd) {
      wx.showToast({ title: '请输入命令', icon: 'none' });
      return;
    }
    wx.request({
      url: 'http://192.168.88.100/send', // 修改为 ESP32 对应的控制接口地址
      method: 'POST', // 或 POST,看你 ESP32 的实现
      data: {
        data: this.data.controlCmd
      },
      header: {
        'content-type': 'application/x-www-form-urlencoded'
      },
      success: (res) => {
        console.log('控制命令发送成功', res.data);
        wx.showToast({ title: '命令发送成功', icon: 'success' });
      },
      fail: (err) => {
        console.error('控制命令发送失败', err);
        wx.showToast({ title: '命令发送失败', icon: 'none' });
      }
    });
  }
});
index.wxss
.container {
  display: flex;
  flex-direction: column;
  height: 100%;
}

.data-section {
  margin-bottom: 20px;
}

.title {
  font-size: 18px;
  color: #333;
  margin-bottom: 10px;
}

.data {
  font-size: 16px;
  color: #666;
}

.control-section {
  display: flex;
  flex-direction: column;
  margin-bottom: 10px;
}

.input {
  border: 1px solid #ccc;
  padding: 10px;
  font-size: 16px;
  margin-bottom: 10px;
}

.btn {
  background-color: #007aff;
  color: #fff;
  padding: 12px;
  border: none;
  border-radius: 5px;
  text-align: center;
}

.dashboard {
  display: flex;
  justify-content: space-between;
  margin-top: 30px;
}

.icon-wrapper {
  display: flex;
  flex-direction: column;
  align-items: center;
  margin: 0 30px; /* 添加左右外边距 */
}

.icon {
  width: 60px;
  height: 60px;
}

.value-text {
  margin-top: 10px;
  font-size: 20px;
  color: #333;
}
Wifi Socket协议控制
Socket协议的控制方式,看起来是更加简单,只需要打开协议,同时打开数据监听就可以在页面内刷新数据,但是其实我在ESP32段的Socket内增加了一些延时,他的显示是相比WIFI会比较慢的第一次,数据的刷新可能会等上1s左右。
index.wxml
<view class="container">
  <!-- 显示 ESP32 返回的数据 -->
  <view class="data-section">
    <text class="title">ESP32 数据</text>
    <text class="data">{{temperature}}°C{{ humidity}}%</text>
  </view>

  <!-- 控制命令输入和发送 -->
  <view class="control-section">
    <input placeholder="输入控制命令" bindinput="onInputChange" value="{{controlCmd}}" class="input"/>
    <t-button size="medium" theme="primary" bindtap="sendCmd">发送命令</t-button>
    <!-- <button bindtap="sendCmd" class="btn">发送命令</button> -->
  </view>

  <!-- 可选:刷新数据按钮 -->
  <view >
    <t-button size="medium" theme="primary" bindtap="getDataFromESP32">刷新数据</t-button>
    <!-- <button bindtap="getDataFromESP32" class="btn">刷新数据</button> -->
  </view>
      <!-- 温湿度区域 -->
  <view class="dashboard">
      <!-- 温度图标及数据 -->
      <view class="icon-wrapper">
        <image src="../images/温度.png" class="icon" />
        <text class="value-text">{{temperature}}°C</text>
      </view>
      <!-- 湿度图标及数据 -->
      <view class="icon-wrapper">
        <image src="../images/湿度.png" class="icon" />
        <text class="value-text">{{humidity}}%</text>
      </view>
  </view>
</view>
index.js
Page({
  data: {
    wifiData: '', // 用于存储从 ESP32 接收到的数据
    controlCmd: '', // 控制命令输入框的值
    temperature: 0, // 温度数据
    humidity: 0, // 湿度数据
    socketOpen: false, // WebSocket 是否已连接
  },

  // 页面加载时初始化 WebSocket 连接
  onLoad: function () {
    this.initWebSocket();
  },

  // 初始化 WebSocket 连接
  initWebSocket: function () {
    const that = this;
    wx.connectSocket({
      url: 'ws://192.168.88.100/ws', // 替换为 ESP32 WebSocket 服务器的地址
      success: function () {
        console.log('WebSocket 连接成功');
      },
      fail: function (err) {
        console.error('WebSocket 连接失败', err);
        wx.showToast({
          title: '连接失败,请重试',
          icon: 'none',
        });
      },
    });

    // 监听 WebSocket 连接打开事件
    wx.onSocketOpen(function () {
      console.log('WebSocket 已连接');
      that.setData({
        socketOpen: true,
      });
    });

    // 监听 WebSocket 接收到消息事件
    wx.onSocketMessage(function (res) {
      console.log('收到数据:', res.data);
      // const data = JSON.parse(res.data); //
      let data = typeof res.data === 'string' ? JSON.parse(res.data) : res.data;
      that.setData({
        temperature: data.temperature || 0, // 更新温度数据
        humidity: data.humidity || 0, // 更新湿度数据
      });
    });

    // 监听 WebSocket 连接关闭事件
    wx.onSocketClose(function () {
      console.log('WebSocket 已关闭');
      that.setData({
        socketOpen: false,
      });
      wx.showToast({
        title: '连接已关闭',
        icon: 'none',
      });
    });

    // 监听 WebSocket 错误事件
    wx.onSocketError(function (err) {
      console.error('WebSocket 发生错误', err);
      wx.showToast({
        title: '连接错误',
        icon: 'none',
      });
    });
  },

  // 输入框内容变化时更新数据
  onInputChange: function (e) {
    this.setData({
      controlCmd: e.detail.value,
    });
  },

  // 发送控制命令
  sendCmd: function () {
    const { controlCmd, socketOpen } = this.data;
    if (!socketOpen) {
      wx.showToast({
        title: '未连接到设备',
        icon: 'none',
      });
      return;
    }
    wx.sendSocketMessage({
      data: controlCmd,
      success: function () {
        console.log('命令发送成功');
      },
      fail: function (err) {
        console.error('命令发送失败', err);
        wx.showToast({
          title: '发送失败',
          icon: 'none',
        });
      },
    });
  },

  // 刷新数据(可选)
  getDataFromESP32: function () {
    if (!this.data.socketOpen) {
      wx.showToast({
        title: '未连接到设备',
        icon: 'none',
      });
      return;
    }
    // 可以向 ESP32 发送一个特定的请求命令来刷新数据
    wx.sendSocketMessage({
      data: 'request_data', // 替换为实际的请求命令
      success: function () {
        console.log('刷新数据请求已发送');
      },
      fail: function (err) {
        console.error('刷新数据请求失败', err);
        wx.showToast({
          title: '请求失败',
          icon: 'none',
        });
      },
    });
  },

  // 页面卸载时关闭 WebSocket 连接
  onUnload: function () {
    wx.closeSocket();
  },
});
index.wxss
.container {
  display: flex;
  flex-direction: column;
  height: 100%;
}

.data-section {
  margin-bottom: 20px;
}

.title {
  font-size: 18px;
  color: #333;
  margin-bottom: 10px;
}

.data {
  font-size: 16px;
  color: #666;
}

.control-section {
  display: flex;
  flex-direction: column;
  margin-bottom: 10px;
}

.input {
  border: 1px solid #ccc;
  padding: 10px;
  font-size: 16px;
  margin-bottom: 10px;
}

.btn {
  background-color: #007aff;
  color: #fff;
  padding: 12px;
  border: none;
  border-radius: 5px;
  text-align: center;
}

.dashboard {
  display: flex;
  justify-content: space-between;
  margin-top: 30px;
}

.icon-wrapper {
  display: flex;
  flex-direction: column;
  align-items: center;
  margin: 0 30px; /* 添加左右外边距 */
}

.icon {
  width: 60px;
  height: 60px;
}

.value-text {
  margin-top: 10px;
  font-size: 20px;
  color: #333;
}
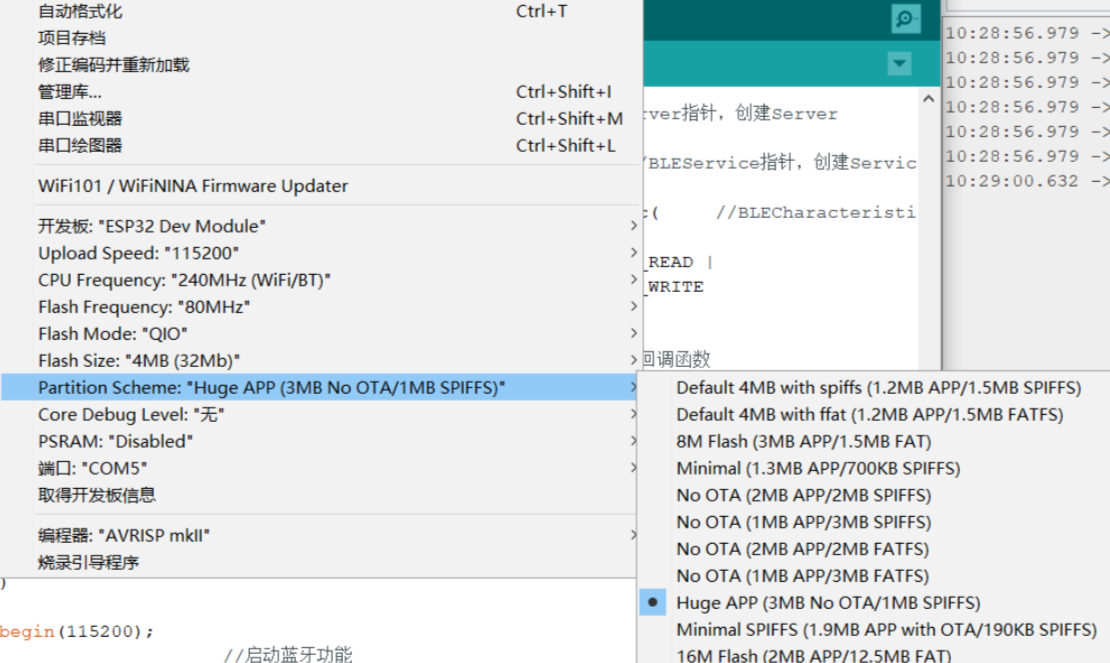
ESP32控制程序
使用ESP32的时候有个需要注意的地方,如果直接使用会直接显示项目内存大,这个可以通过ArduinoIDE去实现调整内存
在ESP32的控制内因为同时使用了HTTP和WebSocket,当这两个同时存在的时候,考虑到我并不需要独立使用WebSocket只是为了数据的展示。因此共享AsyncWebServer是最优的,因为:服务器只需要 server.begin() 一次,节省资源。WebSocket 和 HTTP 都能在 80 端口上正常运行,不用修改前端代码。更快的帮助我构建项目。但是如果你需要独立的Socket其实使用两个AsyncWebServer也是完全可行的。后续因为同时使用HTTP和WebSocket俩都是依靠WIFI来实现的所以将WIFI模块单独拎出来,降低耦合,实现项目的模块更易理解。
sketch_feb18a.ino
#include <SimpleDHT.h>
#include "wifi_communication.h"
#include "bluetooth_communication.h"
#include "WebSocketServer.h"
#include "WiFiManager.h"
#include <ArduinoJson.h>
// for DHT11,
//      VCC: 5V or 3V
//      GND: GND
//      DATA: 19

int pinDHT11 = 19;
SimpleDHT11 dht11(pinDHT11);
const char* ssid = "bartNoLive_zte";
const char* password = "17630925326";

// 静态 IP 配置
IPAddress staticIP(192, 168, 88, 100);  // 替换为你希望的静态 IP 地址
IPAddress gateway(192, 168, 88, 1);     // 网关地址
IPAddress subnet(255, 255, 255, 0);     // 子网掩码
WiFiManager wiFiManager(ssid, password, staticIP, gateway, subnet);
AsyncWebServer server(80);  // 共享服务器
WebSocketServer webSocketServer(&server);
HttpWiFiServer httpWiFiServer(&server);

void setup() {
  Serial.begin(115200);
  // 初始化 WiFi,设置固定 IP
  wiFiManager.connect();

  httpWiFiServer.begin();

  webSocketServer.begin();
  server.begin();  // 只需要调用一次
  // 初始化蓝牙模块
  initBluetooth();
}

void loop() {
  // 如果需要定时向客户端发送数据可以在这里调用 notify()
  // 现在只需等待小程序写入数据,然后 onWrite 回调会打印到串口
  byte temperature = 0;
  byte humidity = 0;
  int err = SimpleDHTErrSuccess;
  if ((err = dht11.read(&temperature, &humidity, NULL)) != SimpleDHTErrSuccess) {
    Serial.print("Read DHT11 failed, err=");
    Serial.println(err);
    delay(1000);
    return;
  }

  // String fakeData = "T:" + String((int)temperature) + ",H:" + String((int)humidity);
  // 使用 ArduinoJson 构造 JSON 数据
  // 根据数据量选择合适的文档容量,这里256字节通常足够简单数据使用
  DynamicJsonDocument doc(256);
  doc["temperature"] = temperature;
  doc["humidity"] = humidity;

  String jsonData;
  serializeJson(doc, jsonData);
  Serial.println(jsonData);

  sendBluetoothData(jsonData);
  httpWiFiServer.sendWiFiData(jsonData);

  static unsigned long lastSendTime = 0;
    const unsigned long interval = 5000;  // 每 5 秒发送一次数据

    if (millis() - lastSendTime >= interval) {
        lastSendTime = millis();
        // String message = "Hello from ESP32 at " + String(millis());
        webSocketServer.sendDataToAllClients(jsonData);  // 调用发送数据的方法
    }
  delay(1000);

}
bluetooth_communication.cpp
这个蓝牙的控制程序其实就是按照这个逻辑来实现的,切记PROPERTY_NOTIFY不开启通知,你是无法实现数据交换的
蓝牙协议
├── 初始化 BLE 设备名称
│ └── 调用 BLEDevice::init(“ESP32_BLE_Device”)
│
├── 创建 BLE 服务
│ └── 创建服务并指定 UUID
│ └── pServer->createService(SERVICE_UUID)
│
├── 创建特征值
│ └── 创建特征值并设置属性(读、写、通知)
│ └── pService->createCharacteristic(CHARACTERISTIC_UUID,PROPERTY_READ | PROPERTY_WRITE | PROPERTY_NOTIFY)
│
├── 添加描述符
│ └── 添加描述符以支持通知
│ └── pCharacteristic->addDescriptor(new BLE2902())
│
├── 设置初始值(可选)
│ └── 设置特征值的初始值
│ └── pCharacteristic->setValue(“Hello from ESP32”)
│
├── 设置写回调
│ └── 设置回调函数,当小程序写入数据时调用 onWrite
│ └── pCharacteristic->setCallbacks(new MyCallbacks())
│
├── 启动服务
│ └── 启动服务以便客户端可以连接
│ └── pService->start()
│
└── 开始广播
└── 开始广播以便设备可被发现
└── BLEAdvertising->start()
#include "bluetooth_communication.h"

BLEServer *pServer;
BLECharacteristic *pCharacteristic;
// 自定义回调类,处理写操作
class MyCallbacks : public BLECharacteristicCallbacks {
  void onWrite(BLECharacteristic* pCharacteristic) override {
    std::string rxValue = pCharacteristic->getValue();
    if (rxValue.length() > 0) {
      Serial.print("Received Value: ");
      for (int i = 0; i < rxValue.length(); i++) {
        Serial.print(rxValue[i]);
      }
      Serial.println();
    }
  }
};

void initBluetooth() {
  // 初始化 BLE
  BLEDevice::init("ESP32_BLE_Device");
  pServer = BLEDevice::createServer();

  // 创建服务
  BLEService* pService = pServer->createService(SERVICE_UUID);

  // 创建特征值,同时支持读、写、通知
  pCharacteristic = pService->createCharacteristic(
    CHARACTERISTIC_UUID,
    BLECharacteristic::PROPERTY_READ | BLECharacteristic::PROPERTY_WRITE | BLECharacteristic::PROPERTY_NOTIFY);
  // 添加描述符,支持通知
  pCharacteristic->addDescriptor(new BLE2902());
  // 设置初始值(可选)
  pCharacteristic->setValue("Hello from ESP32");

  // 设置写回调,当小程序写入数据时调用 onWrite
  pCharacteristic->setCallbacks(new MyCallbacks());

  // 启动服务
  pService->start();

  // 开始广播
  BLEAdvertising* pAdvertising = BLEDevice::getAdvertising();
  pAdvertising->start();

  Serial.println("BLE 初始化完成,等待小程序连接...");
}

void sendBluetoothData(const String& data) {
  if (pCharacteristic) {
    pCharacteristic->setValue(data.c_str());
    pCharacteristic->notify();
    Serial.println("Sending data via Bluetooth: " + data);
  }
}
bluetooth_communication.h
#ifndef BLUETOOTH_COMMUNICATION_H
#define BLUETOOTH_COMMUNICATION_H

#include <BLEDevice.h>
#include <BLEServer.h>
#include <BLEUtils.h>
#include <BLE2902.h>
#include <Arduino.h>
// 定义服务和特征的 UUID
#define SERVICE_UUID "12345678-1234-1234-1234-123456789012"
#define CHARACTERISTIC_UUID "87654321-4321-4321-4321-210987654321"

// 声明全局变量,方便主程序访问
extern BLEServer *pServer;
extern BLECharacteristic *pCharacteristic;

// 初始化蓝牙模块的函数
void initBluetooth();
void sendBluetoothData(const String& data);

#endif
wifi_communication.cpp
wifi的HTTP控制方式其实是比较简单的,注册现有路由,然后启动HTTP服务即可,因为WIFI的连接已经被我抽离做成一个单独的函数所以这里其实是没有WIFI连接和配置的内容。注册路由就和JAVA的API其实是没有什么区别的
#include "wifi_communication.h"

HttpWiFiServer::HttpWiFiServer(AsyncWebServer *sharedServer)
  : server(sharedServer) {  // 初始化 HTTP 服务器端口
}

void HttpWiFiServer::begin() {
    // 注册 HTTP 路由
    server->on("/send", HTTP_POST, [this](AsyncWebServerRequest *request) {
        this->handleData(request);
    });

    server->on("/data", HTTP_GET, [this](AsyncWebServerRequest *request) {
        this->handleDataGet(request);
    });

    // 启动 HTTP 服务器
    server->begin();
    Serial.println("HTTP server started");
}

void HttpWiFiServer::sendWiFiData(const String& data) {
    if (WiFi.status() == WL_CONNECTED) {
        Serial.println("Sending data via WiFi: " + data);
        sensorData = data;
    } else {
        Serial.println("WiFi not connected.");
    }
}

void HttpWiFiServer::handleData(AsyncWebServerRequest *request) {
    String receivedData = "";
    if (request->hasArg("data")) {
        receivedData = request->arg("data");
    } else if (request->hasArg("plain")) {
        receivedData = request->arg("plain");
    }
    Serial.println("Received WiFi data: " + receivedData);

    // 返回响应给客户端
    request->send(200, "text/plain", "Data received");
}

void HttpWiFiServer::handleDataGet(AsyncWebServerRequest *request) {
    Serial.println("Sending sensor data: " + sensorData);
    request->send(200, "text/plain", sensorData);
}
wifi_communication.h
#ifndef WIFI_COMMUNICATION_H
#define WIFI_COMMUNICATION_H

#include <Arduino.h>
#include <WiFi.h>
#include <ESPAsyncWebServer.h>

class HttpWiFiServer {
public:
    HttpWiFiServer(AsyncWebServer *sharedServer);
    void begin();
    void sendWiFiData(const String& data);
    void setSensorData(const String& data);  // 设置传感器数据的方法

private:
    AsyncWebServer *server;
    String sensorData;

    void handleData(AsyncWebServerRequest *request);
    void handleDataGet(AsyncWebServerRequest *request);
};

#endif // WIFI_COMMUNICATION_H
WebSocketServer.cpp
Socket和HTTP的差别看起来其实是没有什么差别的,但是Socket是客户端和服务器建立一个长期的双向通信通道,双方可以随时发送数据。而HTTP是客户端发送请求到服务器,服务器处理请求后返回响应。每次通信结束后,连接关闭。从这个描述来看其实你就应该可以猜到HTTP适合一次性的数据交互,如网页加载、API 调用等,而Socket适合实时交互,如聊天应用、游戏、实时监控等。所以其实在物联网Ioc中,使用Socket来获取数据的上报和下发是最合适的。在Socket中wss是加密,ws是非加密,你可以看到我在小程序的JS内使用的是ws://而不是wss://因为我暂时并没有使用SSL,在本地测试使用ws,会更加的便捷。
#include "WebSocketServer.h"
WebSocketServer::WebSocketServer(AsyncWebServer *sharedServer)
  : server(sharedServer), ws("/ws") {  // 初始化服务器端口和 WebSocket 路由
}

void WebSocketServer::begin() {
    // 注册 WebSocket 事件处理函数
    ws.onEvent([this](AsyncWebSocket *server, AsyncWebSocketClient *client, AwsEventType type, void *arg, uint8_t *data, size_t len) {
        this->onWsEvent(server, client, type, arg, data, len);
    });

    // 将 WebSocket 添加到服务器
    server->addHandler(&ws);

    // 启动服务器
    // server.begin();
    Serial.println("WebSocket server started");
}
void WebSocketServer::sendDataToAllClients(const String& message) {
    ws.textAll(message.c_str());  // 向所有连接的客户端发送文本数据
    Serial.println("Data sent to all clients: " + message);
}
void WebSocketServer::onWsEvent(AsyncWebSocket *server, AsyncWebSocketClient *client, AwsEventType type, void *arg, uint8_t *data, size_t len) {
    if (type == WS_EVT_CONNECT) {
      //当连接时
        Serial.println("Client connected");
    } else if (type == WS_EVT_DISCONNECT) {
      //当断开连接时
        Serial.println("Client disconnected");
    } else if (type == WS_EVT_DATA) {
        //当接收到客户端发送的数据时
        Serial.print("Received data: ");
        for (size_t i = 0; i < len; i++) {
            Serial.print((char)data[i]);
        }
        Serial.println();

        // 回复客户端
        // client->text("Data received");
    }
}
WebSocketServer.h
#ifndef WebSocketServer_h
#define WebSocketServer_h

#include <WiFi.h>
#include <AsyncTCP.h>
#include <ESPAsyncWebServer.h>
#include <AsyncWebSocket.h>

class WebSocketServer {
public:
  WebSocketServer(AsyncWebServer *sharedServer);
  void begin();
  void handleClient();
  void sendDataToAllClients(const String& message);  // 添加发送数据的方法

private:
  AsyncWebServer *server;
  AsyncWebSocket ws;

  void onWsEvent(AsyncWebSocket *server, AsyncWebSocketClient *client, AwsEventType type, void *arg, uint8_t *data, size_t len);
};

#endif
WiFiManager.cpp
这个是WIFI的配置方法,我已经将WIFI的配置和启动都抽离出来了,从而可以解耦,然后提高程序的易读性,和可复用性。
#include "WiFiManager.h"

WiFiManager::WiFiManager(const char* ssid, const char* password, IPAddress staticIP, IPAddress gateway, IPAddress subnet)
  : ssid(ssid), password(password), staticIP(staticIP), gateway(gateway), subnet(subnet) {}

bool WiFiManager::connect() {

  // 配置静态 IP
  if (!WiFi.config(staticIP, gateway, subnet)) {
    Serial.println("WiFi.config failed");
    return false;
  }

  WiFi.begin(ssid, password);
  Serial.println("Connecting to WiFi...");
  while (WiFi.status() != WL_CONNECTED) {
    delay(500);
    Serial.print(".");
  }

  Serial.println("\nWiFi connected");
  Serial.print("IP address: ");
  Serial.println(WiFi.localIP());
  return true;
}
WiFiManager.h
#ifndef WiFiManager_h
#define WiFiManager_h

#include <WiFi.h>

class WiFiManager {
public:
  WiFiManager(const char* ssid, const char* password, IPAddress staticIP, IPAddress gateway, IPAddress subnet);
  bool connect();

private:
  const char* ssid;
  const char* password;
  IPAddress staticIP;
  IPAddress gateway;
  IPAddress subnet;
};

#endif
总结
在了解了通信模式的基本使用方式后使用他实现物联网,或许可以做一些有趣的东西。


- Post link: https://dy1320.top/2025/02/19/esp32/
- Copyright Notice: All articles in this blog are licensed under unless otherwise stated.
GitHub Issues